Please see my other Miscellaneous articles.
Configuring Visual Studio for Dynamic Changes during Publish
This article describes how to use setup a publishing profile to publish the site and configure sections of the site’s configuration file to change depending on the profile chosen.
For example, when publishing the site to the testing layer, the database connection strings should target the testing version of the database.
Visual Studio version: 2019.
Publishing the site while changing its web.config involves three steps:
- Create a Configuration to control settings for the publish profile.
- Create a Create Web.config Transformation File used in the publishing process to dynamically change the web.config profile.
- Create a Publish Profile to control the publishing process based on the target layer (test, live).
Create Configuration
This section describes how to create a configuration file used in the next section to create a transformation file.
1) (Solution Explorer) Right-click the solution -> Configuration Manager.
2) Create a new configuration.
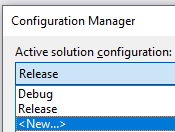 3) Name the configuration, OK, Close.
Create Web.config Transformation File
This section describes how to create and configure a transformation file for the web.config using the configuration created in the last step.
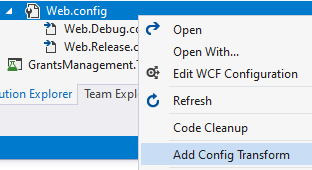
1) (Solution Explorer) Right-click the web.config -> Add Config Transform.
 *Visual Studio creates a new file named after the recently created configuration.
 2) In your web.config (not transformation), place keys (<[tag name]>) to be replaced when publishing the site.
 *Note: Each tag has a “name” property.
3) In your transformation file (Web.Test.config), configure transformations by adding under the following tag your transformation (not the example instruction provided in the file).
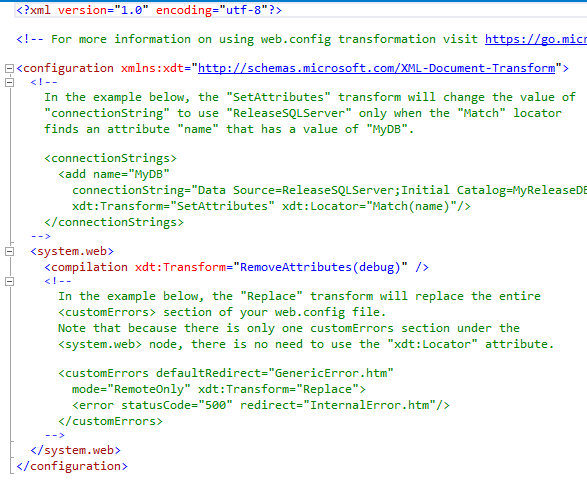 (transformation)
 *In the two transformations above, I’m instructing Visual Studio to find in web.config in the keys, two tags matching the “name” property and replace the current contents of “connectionString” with that in my transformation file.
*The “xdt:Locator” property specifies to match the transformation using the “name” property of tags in the web.config.
Create Publish Profile
This section describes how to create a profile for publishing the site using the configuration and web.config transformation to dynamically change the web.config as the site is being published.
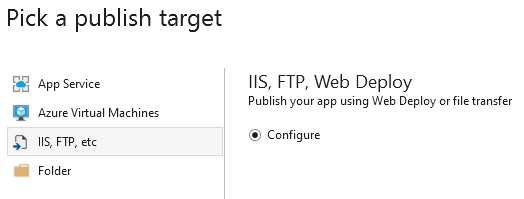
1) Right-click Project (not solution) -> Publish.
 2) Click New.
 3) Click Create Profile.
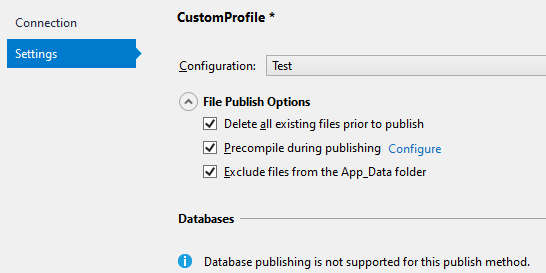
4) Enter the following settings:
 *Target location: [Server name]\[Application name]
5) Next.
6) Ensure the following settings:
 *Note: Ensure to select the configuration created in the previous step – this ensures your transformation created for this profile will overwrite the current web.config file.
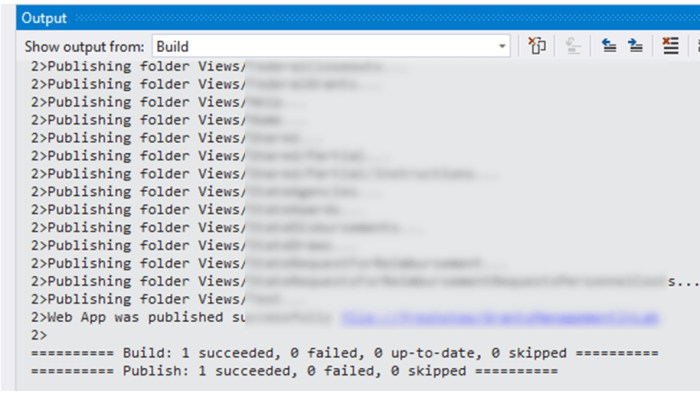
7) Click Publish.
 *You will the results in the Output window – look for “succeded.”
*Upon inspecting the web.config on the target server I can see the two keys were changed from the original web.config using the transformation file.