Creating a new Excel spreadsheet at runtime and writing data into it.
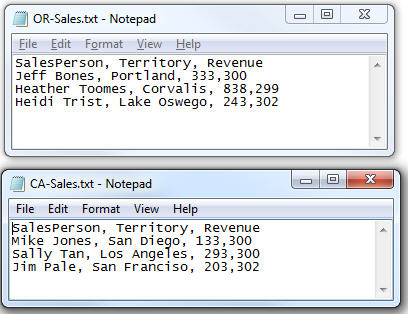
I’ll begin with two separate text files, each representing sales from two states: California and Oregon.
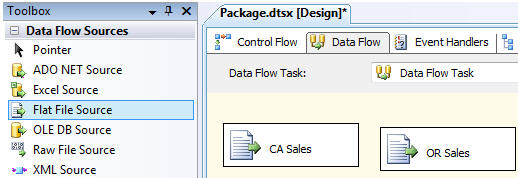
First, I’ll add a DataFlow task and add add to it two Flat File sources each configured to pull in data from the text files.
When configuring the sources, it’s imperative to ensure the “Unicode string” data type is selected due to a quirk with SSIS w
hen importing data into an Excel spreadsheet. Also, if your platform is Windows 64-bit, you might need to set Run64BitRunTime=false.
Next, I’ll drag an Excel destination unto the designer.
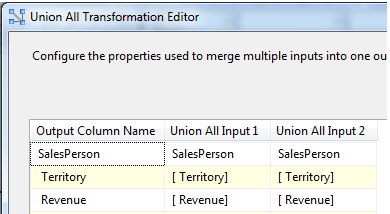
Now I’ll drag a Union All transformation to which I’ll connect both Flat File sources.

By opening the transformation, I can see what columns are expected as well as the final output.
Next, I’ll drag a Sort transformation and connect the Union All transformation to it.
Also, I’ll configure it to sort according to the name, then territory.
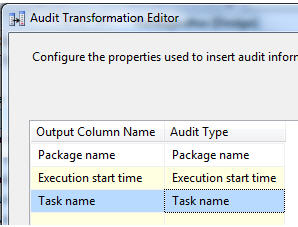
Now I’ll add another transformation called Audit and connect it to the Sort transformation.
Then, I’ll connect the Audit transformation to the Excel destination.
Finally, I’ll configure the Audit transformation to supply extra information.
Configure the Excel Destination to create a new spreadsheet.
Begin by creating a new Connection Manager for the new spreadsheet, then ensure its mappings are correct.
The package is ready for execution, upon doing so, you will see all Tasks turn green and the number of affected rows for each Tasks indicated.
By navigating to the path specified when configuring the Excel Destination Connection Manager, you will see a new Excel spreadsheet with the results from both text files displayed.
