Please see my other MVC articles.
Using Microsoft’s powerful ORM tool to perform data-layer operations.
Most tasks performed in today’s data-driven websites revolved around one or more of the Create-Retrieve-Update-Delete (C.R.U.D.) operations.
Microsoft has provided a very elegant, easy-to-use, yet powerful tool that abstracts a lot of the complexity necessary for most CRUD operations while decreasing development costs. The Entity Framework provides robust Object Relational Mapping (ORM) between the data layer and business layer as this article will illustrate.
To begin, I first created a simple database table sales_people on which I want to perform each of the CRUD actions.

With my sample table ready, I will now an Entity Framework model into my “/Models” folder from the “Data” template.

From the first step, I’ll select to generate my model from a database.

Next, I’ll create a new connection to the database where my model resides and test the newly created connection.

With the connection created and web.config settings ready, I’ll rename the entity to “SalesPeopleEntities” so that it’s more user-friendly.

Under “Choose your Database Objects” I’ll select my target table and rename my model namespace so that it is user-friendly as well.

Now I’m presented with the model designer illustrating the database object(s) exposed to me via the Entity Framework.
Should I need to make any changes to the model in the future, I’ll make them here instead of modifying the underlying “.cs” class.
The Object Browser also provides access to many aspects on my new model.

Next, I’ll add a controller that will use the newly created model to implement CRUD operations.
It’s imperative at this step for the “template” I select “Controller with read/write actions and views…” – this setting ensures my CRUD methods are created.

As you can see, I now have methods to Create, Retrieve (Details), Update, and Delete records for my table.
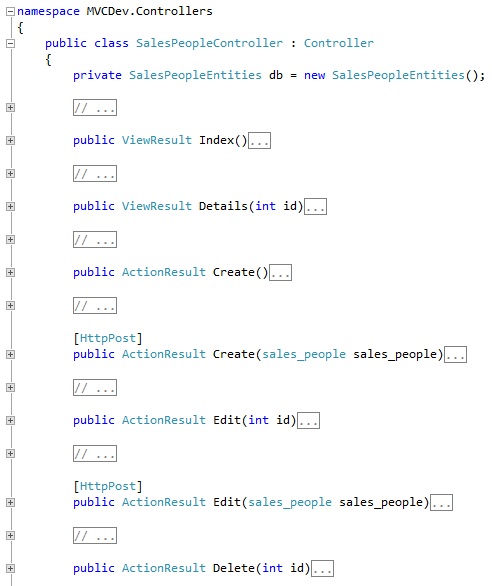
As well as CRUD methods, the wizard also created the necessary views that provide the user with forms form they to utilize the methods.

Here’s the Details view. Notice “@model” statement which begins the view.
This enables the contents of the view to use the “sales_people” model so that it may iterate through its records.
The “@Html.ActionLink()” method provides an HTML link to the Create view.
The “@foreach” statement begins the details portion of the page where each record is accessed and its properties are displayed to the user – “@Html.DisplayFor().”

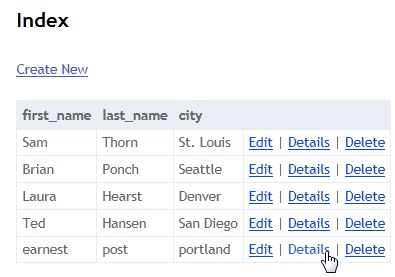
Now I’m ready to run the site and access my SalesPeople controller.
The default Index view displays the all the records in the “sales_people” model along with links to Create, see the record’s Details, Edit the record, and Delete it.

First, I’m going to select the Create link to begin a new record.

Upon submitting the form, I now see my newly create sales person.
Usually, a record contains too many fields to display in the default view so I would normally select the Details view to display a more exhaustive view of the record’s fields.

Let’s say I wish to modify the record.
The Edit link enables me to do just that and I’ve decided to slightly change each field’s value.

Upon submitting my changes I see them displayed back at the default view.
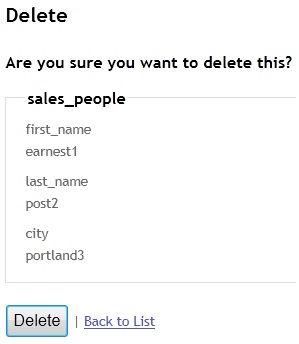
Now I’m going to use the “Delete” link to remove my newly created record.

I’m prompted to confirm that I really do want to delete this record to which I confirm by clicking the “Delete” button.
Now I’m back at the default view with the original record set, excluding the test record I created, retrieved, updated, and then deleted.

